Sunday, June 26, 2011

My First Wood Projects

Here are a few of my beginning projects when I first learned how to use a scroll saw.  While I made countless cut outs that have been lost or thrown away through the years, I knew I could count on my parents keeping anything I made for them over the years.  (You'll notice that almost 100% of the projects on this blog were given to my parents, siblings or other family members.)  I'd like to say my skills have improved since these original projects.
 Check out that masterful carpentry! jk
Good thing mothers are more concerned with effort than final design.  Love ya Mom!
Father's Day a year later, I had learned to cut shapes and paint by then.  The marker has been smeared over the years. 
 These are my first shots at puzzles.  I took pictures out of National Geographic, glued them to a board and started cutting.  You can tell by the pieces that there was no pattern, just random cuts which left some random sharp corners and odd shapes.
 The only difference with this puzzle was that I cut around the eagle and made the cut the rest of the picture into random pieces.

Brainteaser Puzzles

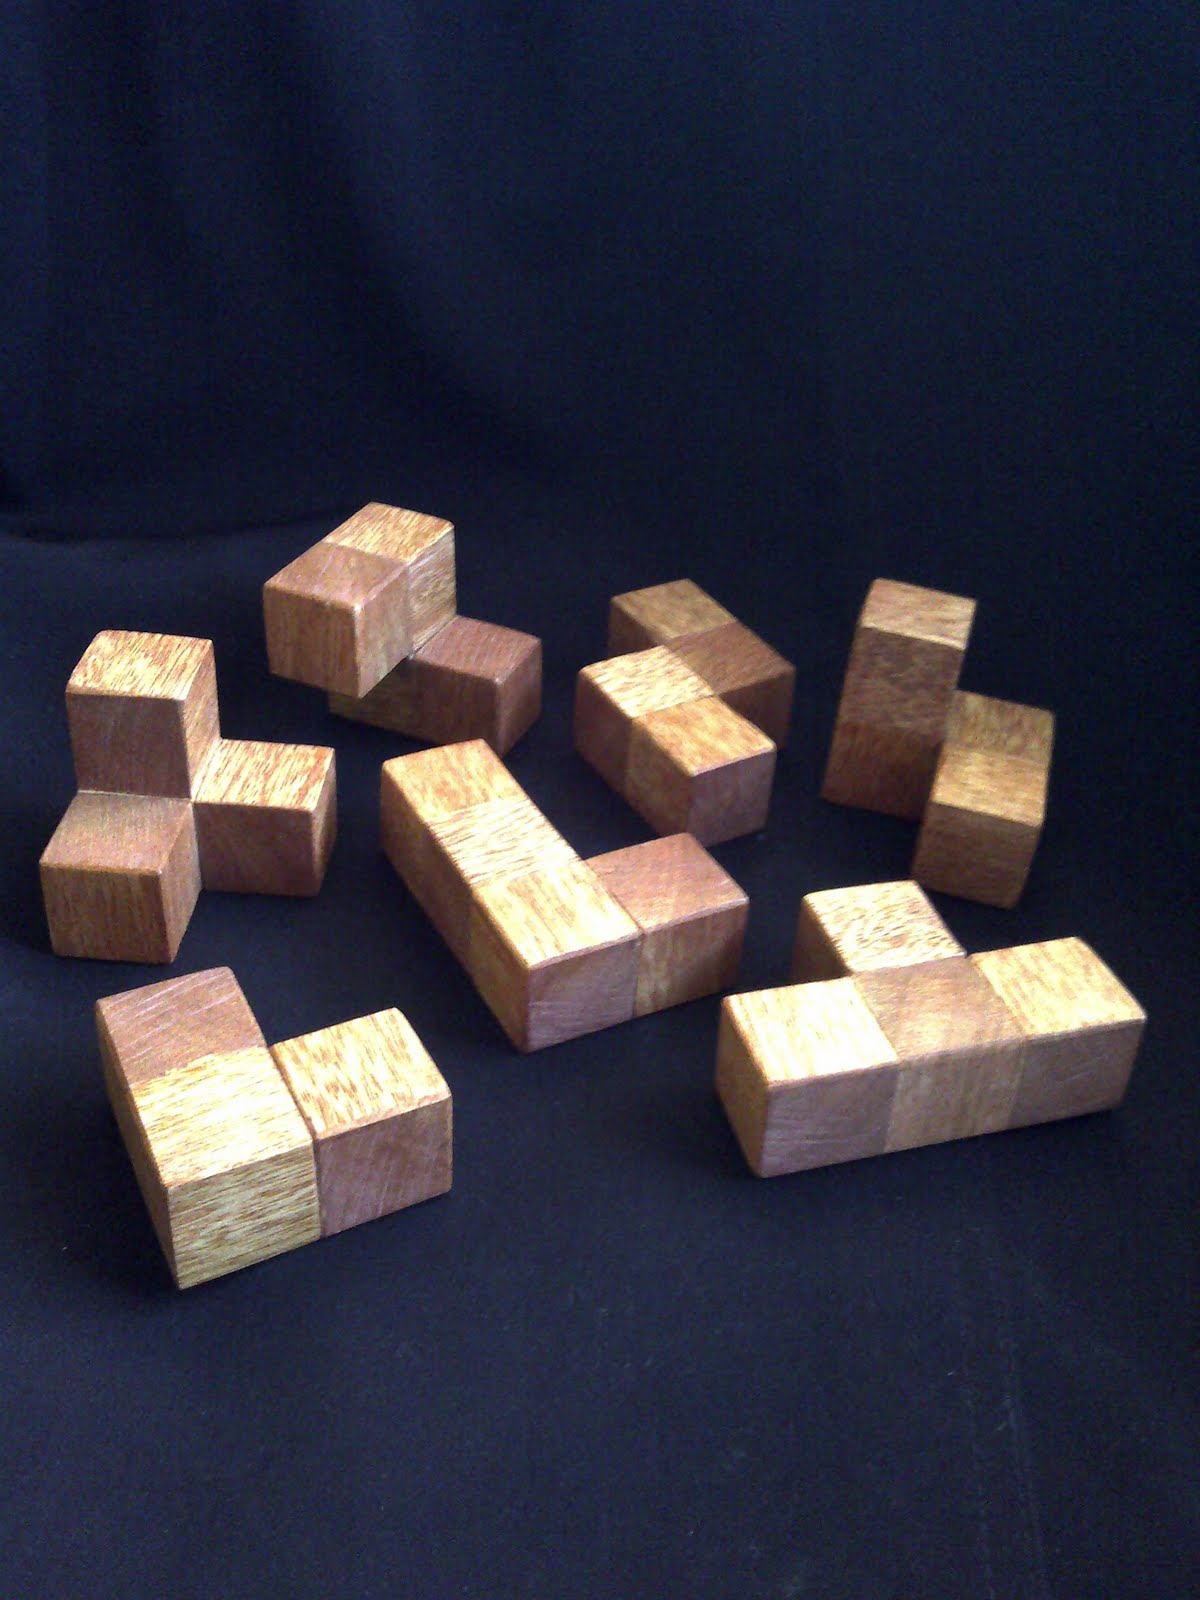
THE CUBE:  This cube consists of 7 unique pieces made of small 1" oak blocks glued together in various configurations.  The cube has multiple combinations and is fun to continually solve over and over in different ways.  I used a cherry stain which makes it a cool display item as well as a game for guests.
I slightly separated the pieces from each other to see how the individual pieces are configured.  This is just one of the many solutions.
 Random picture with a piece placed on top.  I usually don't build things with exact lines and precise measurements (laziness being one reason), but I do like the straight geometric nature of this puzzle.  In order to glue the pieces together perfectly straight, I built a separate little jig with three pieces of wood at right angles.

This final picture shows the 7 unique shapes made out of the 27 little blocks.  As you can obviously tell, the picture was taken on a different day from the others, with much different lighting.

WALNUT BLOCK:  This is a block of walnut about 1.5" x 2" x 4".  The puzzle is very basic in design, but can be difficult to solve.   
 The puzzle was made by running the block length-wise through the scroll saw three times in non-uniform wavy lines.  Once the cuts were made, I put the three pieces back in place and taped the block back together with masking tape.  Once taped, I turned the block on its side and ran another two wavy line cuts through the the piece. 
By making random cuts with no pattern, it left a lot of the pieces looking similar, but they only fit together in one way.  When all the pieces are scattered, it just looks like a random pile of wavy sticks.  Walnut is definitely the best wood for this one because it looks cool and the pieces won't break easily. The easiest way to solve it is to create the three layers separately and then stack them on top of each other.

Sunday, June 5, 2011

The Country Kitchen

For Christmas (2010), Karla and I decided to have a theme for our girl's gifts rather than a collection of random toys. We decided to build a play kitchen and then have the rest of the gifts compliment it (aprons, play food, play dishes, etc). I was going to build a kitchen from scratch, but then I ran into this kitchen at a local thrift store for only $7. I decided to remodel this one rather than build a kitchen from scratch. The first thing I did was remove the counter top. I knew that I wanted to put in a sink by hanging a metal mixing bowl; however, with only a single drawer across the front, a sink wouldn't work. I took apart the drawer and created one smaller drawer for the right hand side and framed out the left side to make room for the sink basin. Because the drawer face extended farther out than the rest of the bottom cupboards, I framed out extensions for the middle cupboard area into two separate spaces, one for the oven and one for a closed cupboard.


The counter top instantly became eye catching with a quick coat of glossy black paint and the sink fixtures. The sink is simply a medium size mixing bowl, hanging freely on its rim in a hole I cut out in the counter top. The faucet and handles are various painted PVC pipe fittings, glued together to make a faucet-like shape.


The oven and cupboard were made by hinging on doors and adding handles. I did cut out a window in the oven door and mounted a piece of plastic on the backside. The handle came from a broken towel holder, fixed between two wooden brackets on the side. The inside of the oven has a single suspended rack made from an old cookie rack. I hung a chain on the right hand side of the oven so that the door would not crash down flat every time it was opened. I also installed a small magnetic latch on the top side to stop accidental openings from getting bumped by crazy children.


After stocking the kitchen with pots and pans, dishes, utensils and play food, it is a fun play toy and fixture in our home now.


Family Puzzle

This is not actually a new piece. I built this for Karla when she was pregnant with our first child back in 2007. At the time, I had no idea that that same child would one day love to pull the puzzle down from the top of the piano and play with it over and over. All the pieces were cut from the same piece of 1" poplar. I stained the various pieces to add color contrast to the puzzle. The full puzzle stands 6" high and is a great family reminder in our home.

Sunday, January 31, 2010

The Book of Mormon Arches

During one of the last "zone conferences" I attended on my mission in Thailand in 2004, we discussed the pinnacle role of The Book of Mormon in bringing people unto Christ and its symbolism as the "keystone of our religion".  The validity and rigidity of The Church of Jesus Christ of Latter-Day Saints stands or falls with the truthfulness of The Book of Mormon.  I doodled a drawing of an arch with The Book of Mormon as the keystone and decided right then that when I got home, I would build one out of wood.  Within the first week or so of being home, I built my first Book of Mormon Arch for my Mission President and his wife, President and Sister Hansen.  This year (2009), I built another one for my parents for Christmas.  I knew they liked the original one and my mom had made hints that she wanted one...it took 5 years, but I did it.
All of the pieces are seperate and unattached with the exeption of The Book of Mormon and the small pieces on either side of it.  I did this because normal keystones are pie shaped and hold the arch up with the weight pressing against the side pieces, a book shape simply slides out.  The project is a nice symbolic piece and not meant to be used as a literal object lesson.  It makes for a fun puzzle for the kids too!  

Sunday, December 27, 2009

Wooden Swing

For Christmas in 2006, I gave my brother and sister-in-law a coupon for a wooden project out of my shop.  They were expecting their first child that January and I couldn't decide on a project to make for them.  It took them 3 years to redeem.  I had already started on the piano project for them when they asked to redeem their voucher for this Christmas (2009).  They said they wanted a swing to hang from their wooden swingset frame that they picked up from craigslist.  I got the basic design from looking at wooden swings online, I won't tell you how I estimated an appropriate length for the swing to fit an average adult.

I used some old 2x4's in my garage and planed them down with my electric hand planer.  I had no idea how pretty a 2x4 was inside.  (A lesson in outward appearances I guess.)  With a couple thick coats of marine quality varnish, this swing will hold up against the elements for years!


The swing was designed to hang from four 3/4" nylon ropes inserted through the holes in the top and tied off under the swing.  I reinforced the swing with two strips of 1" poplar, glued to the three planks and fastened with a nut & bolt on the middle one.  It makes for a very sturdy and safe swing.


I routered all the edges of the swing so there would be no sharp edges and to eliminate the potential for slivers.  I imagine slivers from a swing being quite unpleasant!  I routered out the top and bottom of the rope holes to protect against rope wear from excess rubbing after years of use.  This was a super fun project to work on, and again look at how beautiful the wood really is!  It was a fairly simple project, but it was solid and turned out great.

Saturday, November 28, 2009

Orrell Mission Plaque


Prior to leaving on my mission to Thailand, I made my parents a mission plaque which represented all of the missions served by members of our family (I updated it when Brad received his mission call and will post it on this blog later on).  For Christmas this year, I made my in-laws a mission plaque to show their worldwide service.  The timing of our move resulted in some early Christmas gifts...like the piano in my last post.  All other Christmas gifts won't be posted until after Christmas.  The scripture in the top right hand corner is Matt. 28:19 "Go ye therefore and teach all nations..."


I timed myself on each of the sections of this project so I could best price the entire project for other people wanting one.  Hawaii took me the longest- 26 minutes on a scroll saw.  I knew that Hawaii natives would hold me accountable for each little cove on their island...for instance, I actually cut Pearl Harbor into Oahu.  The amazing part is I didn't even cut my fingers!  I think it turned out really cool.

Karla's dad served 6 months in Honduras, Nicaragua, Costa Rica and Panama.  I stained the wood to show the contrast between countries.  All the pieces on this plaque are cut from 1" Poplar stock.  I have come a long way since my first mission plaque in Jan. '03.  I also used shadow boxes with felt and velcro...that way adjustments and additions can be made easily within the box!

I tried having a local trophy shop engrave the flags on metal, but laminated paper glued to wood ended up looking better.  I woodburned the mission names under the respective flags.


Merry Christmas Tom and Barbara!